Imagine this— You’ve just landed on your dream country, ready for an exciting trip, and after switching to your new SIM card, you try to send a message—but iMessage isn’t working! Don’t panic. If you’ve changed your SIM card, this is a common issue, but it’s easy to fix.
In this guide, we’ll explain how to quickly set up iMessage again after changing your SIM, so you can stay connected with friends and family.
What is iMessage?
Before we jump into how to set up iMessage after changing your SIM, let’s talk about what iMessage actually is. If you’re an iPhone user, you’re already familiar with iMessage as Apple’s messaging service that uses data instead of traditional SMS. Whether you’re sending texts, photos, videos, or GIFs, iMessage ensures your communication is fast, seamless, and free (if you’re connected to Wi-Fi or have a data plan, of course!).
But here’s the catch: when you change your SIM card, your iPhone might not automatically re-activate iMessage. Why? Because iMessage is linked to your phone number, and swapping SIMs means your iPhone needs to recognize this change to function properly again. That’s where our guide comes in handy.
Why iMessage Stops Working When You Change SIM Cards
It’s a question travelers often ask: Why is iMessage not working on my new SIM? Changing SIM cards can throw off your iPhone’s ability to send iMessages because Apple verifies iMessage through your phone number. When you pop in a new SIM card, the phone number associated with iMessage changes, and if the system doesn’t recognize the new number, iMessage won’t work.
This can be frustrating, especially if you rely on iMessage for your daily communications. Luckily, setting it up again is super simple, and with a few quick steps, you’ll be back to messaging in no time.
Step-by-Step: How to Set Up iMessage After Changing SIM Cards
To answer your question, How Do I Activate My New SIM for iMessage? Follow this step-by-step guide and you can now reactivate iMessage on your new SIM in just a few minutes!
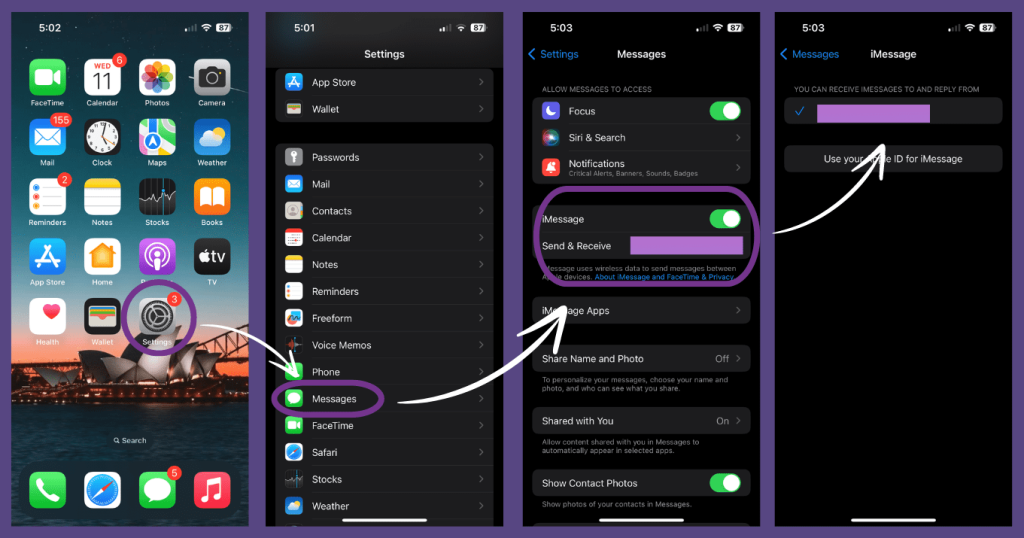
1. Open Your Settings App: The first thing you need to do is go to the Settings app on your iPhone.
2. Find “Messages”: Once you’re in the setting menu, scroll down and tap on “Messages”.
3. Turn iMessage Off and On Again: Toggle the switch next to iMessage to turn it off. Wait for about 10 seconds, then switch it back on. This helps reset iMessage and makes sure your new SIM is recognized.
4. Check “Send & Receive”: Next, tap on “Send & Receive.” Make sure your new phone number (the one linked to your new SIM) is selected. If it’s not, you may need to manually select it.
5. Restart Your iPhone: Once you’ve made these changes, restart your iPhone. This refreshes the system and can fix any lingering issues.
6. Wait for Activation: iMessage will take a few minutes to activate. You might see a message that says “Waiting for activation,” but don’t worry—it usually resolves quickly. Once done, iMessage will be back to normal!
Now that you know how to set up iMessage after changing your SIM card, you’re ready to enjoy your travels without any hiccups in communication—staying connected effortlessly while exploring new destinations. With Aerobile’s budget-friendly eSIM plans for US and Canadian travelers, you’ll enjoy reliable mobile service without the hassle of switching SIMs repeatedly.
At Aerobile, we’re here to help you stay connected, wherever your travels take you. So the next time you’re on the move, trust Aerobile to provide you with seamless connectivity and peace of mind.